Showing posts with label Basics. Show all posts

Monday, March 7, 2011

Croutons for Max

I stayed with my brother for a night over the weekend, meaning I spent time with his two kittens (well they're a few months old so not exactly kittens- but they will always be kittens in my mind!). Unlike a "normal" college kid, I am unable to sleep in. So waking up hours before Max, I entertained myself in the kitchen.

Max is far from a healthy eater, well I guess he would be considered "normal" as far as college kids go. You know, ramen and carry-out and the occasional spaghetti and store-bought meat sauce. However he does have one habit that I 100% approve of. Just like my dad, Max likes salad. Not as an everyday, more than once a day thing like I enjoy but not once in a blue moon either.

Anyways, the inspiration for making croutons at 9 am came from trying to promote this behavior and the excessive amounts of bread in Max's apartment (Really? Four loaves of bread for one person??).


Croutons
AKA a great way to use up stale bread


Ingredients:
bread
oil
seasonings (I used dried basil and oregano)

Directions:
Preheat oven to 400F
Cut bread into cubes and dump into a bowl.
Drizzle with oil and toss well to coat.
Sprinkle with seasonings and toss some more.
Pour onto a cookie sheet lined with aluminum foil.
Bake until crispy and golden brown, flipping halfway through (Mine took about 10 minutes but be careful not to burn them!).

Use liberally on salads, soups, or when you get the munchies!


Love, Jayne and Kaylee and Sam

Sunday, February 27, 2011

Life Changing.


Also known as, parmesan "cheese". I am absolutely blown away by how easy this is to make and how versatile it is (meaning how much I want to put this on everything). It is actually eery how much this tastes like cheese. Plus it's mainly sesame seeds which are a good source of Calcium, Iron, Magnesium and Phosphorus, and a very good source of Copper and Manganese.

"Parmesan Cheese"
Ingredients:
1/2 c sesame seeds
2 T nutritional yeast
1/4 t salt

Directions:
Toast sesame seeds in a dry skillet until golden brown and fragrant, about 10 minutes.
Pulse all ingredients in a food processor.
Cover your life in cheeZe.

My Caesar Salad
Adapted from 101 Cookbooks. Spicy, cheeZe-y goodness.


Ingredients:
Dressing
1 garlic clove, minced
1/4 t salt
1/4 c "Parmesan Cheese," above
3 T olive oil
juice of 1 lemon (1/4 c or 1/4 c of apple cider vinegar)
a pinch of red pepper flakes
a pinch of salt
Salad
1 bunch kale
1 T olive oil
1/4 c olives, chopped (optional)
1 slice of good bread (optional)
as much dressing as you see fit

Directions:
Toast bread until golden brown and dry throughout.
Tear into small pieces and pulse in a food processor until the it forms coarse crumbs.


De-stem kale and tear into bite size pieces.
Drizzle with 1 T oil and massage for a few minutes to soften.


Smoosh together the garlic and 1/4 t salt.
Whisk in the rest of the dressing ingredients.


Pour enough dressing over the kale to thoroughly coat.
Toss well, the dressing is thiiick.
Garnish with olives and breadcrumbs.

Sweet Potato and Caramelized Onion Pizza

Sweet Potato and Caramelized Onion Pizza
Inspired by The Hungry Birdie


Ingredients:
1 prepared whole wheat pizza dough
1 onion, sliced
1 sweet potato, thinly sliced into rounds
1 garlic clove, minced
3 T oil
1 T fresh thyme (or 1/2 T dried)
salt and pepper

Directions:
Preheat oven to 400F
Pre-bake rolled out dough for 5 minutes, take out and set aside.
Sprinkle onions with salt and sauté on low heat until soft and caramelized, about 15 minutes, set aside.
In same pan, quickly sauté thinly sliced potatoes until softened, set aside. (You can also steam them)
Add oil to same pan and saute garlic until starting to brown, DO NOT BURN.
Paint garlic-oil mixture onto pre-baked crust.
Spread onions onto dough and sprinkle with freshly ground pepper.
Place sweet potato rounds onto dough and sprinkle with fresh thyme.
Bake for about 10-15 minutes, until golden brown and crispy.

Monday, February 21, 2011

Kale-Almond Pesto

Traditional pesto is made with basil and pine nuts but boy, is that expensive! The day that I learned that just about any leafy green and just about any nut can be combined to make a stellar pesto was a pretty life changing one indeed.


Ingredients:
1 bunch kale (or other leafy green)
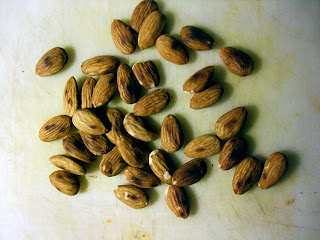
1/3 c almonds (or other nut)
3 cloves roasted garlic (directions below!)*
1/2 t salt
2 T lemon juice (juice of 1 lemon)
1 T olive oil
1 pinch red pepper flakes

Directions:
Steam kale for a few minutes until bright green.
Toast almonds in a dry skillet until fragrant BUT NOT BURNT, about 10 minutes.
Pulse kale in a food processor until finely chopped.
Add in almonds and roasted garlic and do the same.
Add in the rest of the ingredients and process until desired consistency is reached.


*How to quickly roast garlic:
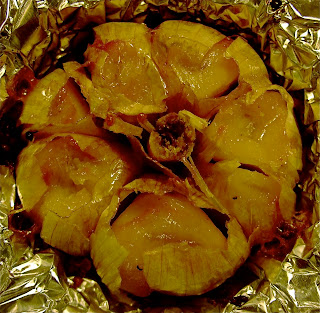
Roasted garlic is the best. You can roast whole heads in the oven (shown here) but if you are faced with a time crunch, a skillet works just as well!

Directions:
Separate cloves from head and remove papery skin, leaving the immediate layer of skin as a protective barrier between the clove and the skillet.
Drop garlic into skillet over medium heat and allow to roast for about 10-15 minutes.
Move the cloves around every so often as to prevent burning.
Remove from heat when the innards feel mushy inside their skins.
Squish out the garlicky goodness and use to your heart's content!

<3

This is in preparation for a cooking demonstration that the Michigan Sustainable Foods Initiative is having on Wednesday! I was asked to be the "demonstrator" and, needless to say, I am more than excited.

The menu I have concocted is as follows:
Sweet Potato and Caramelized Onion Pizza with Garlic and Fresh Thyme
Spicy Roasted Tomato Pizza with Kale-Almond Pesto
Cinnamon Apple Dessert Pizza

I have never made any of these before so Wednesday will be quite the experimentation. Wish me luck!

Thursday, February 3, 2011

Miso Soup

The People's Food Co-op got new bulk miso! For the past two years that I have been buying miso from them, they have had white miso in bulk. White miso is much milder than other misos and is sometimes called sweet miso. This is really good for making dressings but I definitely prefer a darker full-flavored miso.

This past Saturday my world got flipped upside down. Red Adzuki Bean Miso:


Basic Kombu Dashi
Dashi is a basic Japanese soup stock that can be made with kombu, bonito flakes, sardines, and/or dried shiitaki mushrooms. Here's a recipe for the kombu one. Kombu is a type of sea vegetable (can be bought in bulk at the People's Food Co-op).

Directions:
Soak kombu in cold water for 30 minutes in a pot.
Bring water to an ALMOST boil.
Remove kombu from water right before it boils.
Done.

Miso Soup (with Daikon, Carrot, Mushrooms, and Wakame)
There are a bajillion ways to make miso soup. You can put just about anything in it as long as you end with adding miso in. Here's my miso today!


Ingredients:
dashi (recipe above)
3 daikons (1)
greens from 1 daikon (1)
1 carrot (2)
a handful of dried mushrooms (3)
a handful of wakame (4)
4 T red or brown miso (amount depends on how much dashi you start with) (4)

Directions:
Soak dried mushrooms and wakame separately in water to rehydrate.
Heat dashi to a simmer.
Cut daikons in half length-wise, thinly slice into half moons and drop into simmering dashi.
Thinly slice carrot and drop into simmering soup.
Once daikon and carrots are cooked (soft to the touch) add in wakame and mushrooms.
Remove daikon greens from their stem and drop into simmering soup.
Allow to cook for a couple more minutes and then remove from heat.
Dilute miso with an equal amount of water.
Add miso to soup once it cools a bit.*
Enjoy!


*Letting the soup cool before adding the miso is an important step. Miso is a fermented bean paste so if you add it to simmering water, you will kill all of the happy bacteria that is so good for you!

(1) From Whole Foods Market, labelled as "Local" because they bought it from a farm in MI
(2) Left over from making snowmen yesterday :)
(3) I dried these myself from the fall. I believe I bought them from Tantre Farm originally...
(4) Bulk section of the People's Food Co-op

Thursday, January 27, 2011

Oven Roasted Tomatoes

Remember in summer when tomatoes were everywhere you turned at the farmer's market, heaped on tables, farmer's essentially giving them away for free because there were so many of them? This is the time to buy tomatoes.

But as many of us who buy local and organic produce know, tomatoes go bad quickly. An enzyme in them naturally starts breaking down the cell walls (causing them to softened and ooze) because natural selection taught them that this would help disperse their seeds quicker, increasing the livelihood of the species.

Solution: Oven roast those bad boys! Slow roasting tomatoes dehydrates them, concentrating their flavor and preserves them (think sun-dried tomatoes). This way, we can enjoy the summer sweetness of local tomatoes well into winter! And at the cheap price of a vegetable at the peak of their season.

Pre-bake

Attempt #1: I forgot they were in the oven and
ended up baking them for like... 20 hours. Oops!

Attempt #2: Perfection!

Oven Roasted Tomatoes
Two methods: Low-and-Slow and Fast-and-Hot. The first dehydrates the tomatoes retaining and intensifying their flavor (this is the method I used), while the second retains more moisture and adds a crispy-charred flavor.

Directions:
Wash tomatoes and cut them in half.
Place halves, cut side up, onto a cookie sheet.
Low-and-Slow:
Preheat oven to 150-175F.
Slow cook for 4, 6, 9 hours, to your desired degree of doneness.
You'll know they're ready when they've withered, seem plump, and have a wee bit of juice left.
Fast-and-Hot:
Preheat oven to 400-450F
Place tomatoes in oven and they'll finish in less than an hour!
Pay attention towards the end because smaller pieces/edges can burn...

Tossing the tomato halves with oil, salt and other seasonings (oregano, thyme, tarragon...) before baking transforms them into tasty snacks and great additions to pastas and other dishes!

Tuesday, January 25, 2011

Herbal Ice Cubes

This is a project I did back in October! Not sure why I haven't posted it yet but as I clear away the cobwebs of blog drafts, here it is!

How to make herbal ice cubes
What you need:
Lots of (local, organic) herbs
An ice cube tray


 Dill
 Sage
 Parsley
 Rosemary
 Mint

Directions:
Prepare (i.e. separate leaves from stems) and wash the herbs.
Pulse herbs in a food processor or blender.
Add enough olive oil or water until the herbs and liquids blend together well.
Plop spoonfuls of herb mixtures into ice cube trays and freeze.

Once herb cubes are frozen solid, pop them out and store them in a zip lock bag in the freezer.
LABEL THE BAGS. This is a step that I forgot to do and I am regretting it; all the cubes look the same!

I am so so happy that I did this, I can just thaw out a cube and have fresh parsley, mint, and rosemary in anything that I cook!

Thursday, December 23, 2010

The flax egg.

I obviously do not use eggs in the things that I cook which is sometimes a problem since it has levening and binding qualities when used for baking. Luckily there are some simple and easy ways around using eggs.

But first, let's look at eggs from a health stand point:
  • A Harvard study of over 21,000 male physicians found that men who ate up to 6 eggs a week had no increase in their rate of death. But once they ate a seventh egg, their risk of death went up 23%. The men were studied over a 20-year period and routinely surveyed about their health status and eating habits. During that period, 1,550 had heart attacks, 1,342 had strokes and 5,000 died.
  • The cholesterol in eggs is the most obvious culprit. This cholesterol can clog arteries and contribute to heart attacks and strokes.
  • Also, let's not forget about the saturated fat they contain.
  • Interestingly enough, free-range chickens produce eggs with notably less cholesterol and saturated fat and much higher levels of (healthy) omega-3 fats! (but beware of green marketing, only trust humane conditions of someone you can actually talk to. i.e. local farmers.)

Next, it is necessary to realize what the PURPOSE is for having eggs in a recipe (binding or levening):
1. Thickening and Binding: this means keeping everything together (think falafels).
Good replacements*:

  • The flax egg (below)
  • Ener G Egg replacer (but this has so much unnecessary packaging...)
  • 3 T pureed tofu + 2 t cornstarch (good for quiches and custard pies)
  • 1/4 c applesauce
  • 1/4 c mashed banana
  • 1/4 c pureed pumpkin or squash
2. Thickening
  • 1 T chick pea or soy flour + 1 T water 
  • 1 T arrowroot + 1 T soya flour + 2 T water 
2. Leavening: this means making it rise (think cookies and cakes).
Good replacements*:

  • 1/4 c soymilk + 1 T lemon juice
  • 1/4 c vegan sour cream + 1 t baking soda
  • 2 heaped t baking powder
  • instead of baking powder, use 3/4 t bicarbonate of soda + 1 T cider vinegar
For cakes and quickbreads, add 2 T of cornstarch (for each egg replaced) in addition to the egg replacer, in order to bind and give it a good texture.


*This is for replacing one egg. Increase magnitude if recipe asks for more than one egg!


The flax egg
This is my replacer of choice, no matter what the egg's purpose is. Just because it is healthy and mindless. I'm lazy. I grind my flax seeds in my food processor (only because I don't have a coffee grinder) and keep it in my freezer.

Ingredients (replaces one egg):
1 T ground flax seeds (1)
3 T cold water

Directions:
Whisk together before adding it to whatever you're cooking/baking!

(1) Ernst Farm

Monday, December 13, 2010

Homemade Nut Butter


This is the easiest and cheapest way to make nut butters. And any nut will do, go traditional with peanuts or get creative by all the variations that you can have!

The only things that are mandatory are nuts and a food processor.

Ingredients:
Nut of choice (almonds, peanuts, walnuts, pistachios...)


Directions:
Put as many nuts as you want (I did 2 cups) in a food processor.
Process for about 15 minutes.

I typically let it go for 2-5 minute intervals because I'm afraid that my food processor will overheat.

It's a pretty cool process, for the first like 10 minutes it is pretty dry and grainy (if you are trying to make nut flour or meal, this is where you stop). The first time that I made almond butter I was convinced I had to add olive oil or something because it was still not butter-y after such a long time. But I promise that added oil is not necessary. Just keep grinding, eventually a ball will form and then it gets super smooth.


Variations:
  • Add in sugar or another form of sweetener (maple syrup, honey...) to make it sweet.
  • Roast the nuts in the oven before processing them.
  • Add in salt for a more traditional (commercial) flavor
  • Add in cocoa powder (oh hey you may or may not be able to recreate a certain 'chocolate hazelnut spread' in your own kitchen...)
  • Have fun with spices! They're great.

Monday, December 6, 2010

Sourdough Starter

I've done it. It happened. Commitment made. I have started my sourdough culture!

That distinct flavor of sourdough bread is due to the lactic and acetic acid that bacteria growing in the sourdough culture produce. Interested in learning more? Read me!

Essentially you mix together equal parts flour and water and since there is yeast on the flour and in the air a culture grows! As long as you "feed" the culture every 8-24 hours you're golden.

I'm following this video (the guy is pretty goofy...):


I'm a little nervous because I'm using whole wheat flour from Earnst Farms and the dude is using white flour. I'm wondering if that will screw up the flour to water ratio? I guess we'll see!

Sourdough Starter Day #1

Here's a pretty interesting article on the health benefits of sourdough bread.

Tuesday, November 23, 2010

Roasted Red Pepper Vinaigrette

I used this on a salad consisting of kale and diced yellow bell peppers. Yum! It's actually thick enough to be a dip or a sandwich spread as well.


Ingredients:
1 roasted red pepper (below)
3/4 t maple syrup (or equivalent of sweetener of choice)
1 small white onion, diced (I roasted this along with the red pepper. My goodness if you've ever smelled a roasted onion you know why...)
a generous amount of salt and pepper, to taste
1 t Dijon mustard
1/4 c apple cider vinegar
1/3 c olive oil

Direction:
Puree all ingredients in a food processor or blender, until smooth.


How to roast a red pepper:
You really can't go wrong with roasted red peppers. They add a unique sweetness to dishes that is simultaneously savory, unlike the sweetness of sugar. Great on fajitas and sandwiches, or salad dressing (above), and many other recipes (below)!

Directions:
Preheat oven to 425F
Place whole red pepper on a cookie sheet lined with aluminum foil.
Pop in oven and let 'er char (get excited for the wafting aromas of sweetness to fill your kitchen).
Roast until black and blistery, rotating every 15 minutes.
Remove from oven and place in a brown paper bag to cool (the steam of the pepper juices will loosen the skin!)
Peel off the charred skin.*
Remove the stem* and cut open the pepper to expose the innards.
Remove the seeds and white ribs.*
Use immediately or store completely submerged in olive oil in a glass jar.

*Don't forget to compost!

Other Recipes Containing Roasted Red Peppers:
Romesco Sauce from Happy Valley Locavore
Vegetable Fajitas from Broke 'n' Veggie
Bruschetta with Roasted Sweet Bell Peppers
Red Pepper Soup from Smitten Kitchen
Pizza with Red and Yellow Peppers from Smitten Kitchen
Roasted Red Pepper Hummus from Pinch My Salt
Panini with Artichoke Hearts, Spinach and Red Peppers
Red Pepper Ravioli with Cream Sauce from BBC Food
Posted by Picasa

Monday, November 8, 2010

Homemade Vegetable Broth

This weekend was a weekend of soup for me. And I couldn't be happier! Tis the season for warm things on the stove and in my stomach.

I have been meaning to make veggie broth for a while now since it is a base for so many recipes (and not just for other soups: grains and stuffing and roasted mushrooms, oh my!) so I turned to my girl, Lolo, for a way too simple recipe.

Definitely check out the original recipe at veganyumyum.com (she has the best photography) but here are my actions just to show my sheer delight in following the everything-but-the-kitchen-sink approach.

Homemade Vegetable Stock
Basically boil some vegetables in a pot and add some salt and you're good to go!

steamayy

Ingredients:
3T oil
2 large onions, chopped
3 stalks of celery, chopped
about 10 carrots, not peeled but chopped
3 cloves of garlic, left whole
1 bay leaf
10 peppercorns
(and here's where I go frugal)
broccoli stalks
celeriac greens
2 dried shiitaki mushrooms
2 c frozen tomato puree*
a few sprigs of thyme

Directions:
Heat the oil in a large pot over medium heat and start dicing the onions.
Once the onions are diced, move on to the next item on the list and start chopping that.
Keep chopping and adding until there is no more to chop.
Add 1 gallon (16 cups) of water, cover and bring to a boil.
Reduce to a simmer and leave it alone for an hour.
Add 1/4 c tamari and 2 t of salt (adjust to taste).
Simmer uncovered for 30 minutes.
Strain vegetables out in a large pot.

At this point you can really do what you want with your homemade, (hopefully) locally-sourced, organic, delicious vegetable broth!

Personally, I ladled 1 cup amounts into glass cups (ice trays or muffin tins would have the same effect) and froze em for easier measuring in the future. It was a bit of a pain trying to get the frozen broth free from the cup, I kind of felt like some sort of archaeologist ice picking an ice-age specimen out of a glacier (is that weird??), but applying pressure to a knife in between the broth-block and the glass eventually worked itself out.

*I did this back in September to preserve some summer lovin. And now I have about 4 gallons of that lovin ch-ch-ch-chillin in my freezer for who knows what recipe!

Monday, November 1, 2010

Roasted Eggplant

Yesterday was a bit of a fridge clean out for me. I keep adding new veggies to my Crisper drawer, ultimately hiding past purchases. One discovery of this sort was 3 eggplants from a farmer's market past. Knowing that I typically get lost in the internet while looking up recipes (those gosh darn links get me every time...) I resorted to the simplest and most familiar cooking method to me thanks to repeated baba ghanouj escapades; roasting!

Roasted Eggplant

Directions:
Preheat oven to 425F
Cut top off of eggplant and in half length-wise.
Prick eggplant with a fork if using larger eggplant.
Line baking sheet with aluminum foil.
Brush foil with oil and place eggplant onto sheet, cut side down.
Cook until eggplant starts to collapse, around 25 minutes.
Remove seeds (I don't do this but the internet tells me otherwise).
Scoop flesh out of skins and use as you wish!

I typically just mix eggplant with salt, pepper, garlic granules, and random herbs but here are some more complicated recipes that look pretty darn good:
Italian Eggplant Stacks (also not vegan)

Couscous with Apples, Raisins and Walnuts

Michigan apples, whaddup whaddup!


Couscous with Apples, Raisins and Walnuts

Based off of a Giada De Laurentiis recipe


Ingredients:

Couscous:

2 T oil

2 c couscous

4 c water

1 t salt

1/8 c dried parsley

1 T dried rosemary

2 t fresh thyme leaves

1 apple, diced

1 c raisins

1/2 c walnuts, toasted (see below)

Vinaigrette:

1/4 c apple cider vinegar

2 T maple syrup

1 T salt

1/2 t ground pepper

1/4 c olive oil


Directions:
Heat oil in a saucepan over medium-high heat.
Add couscous and cook, stirring occasionally, for about 5 minutes, until browned and aromatic.
Add water and salt and bring to a boil.
Reduce to a simmer and cook until liquid is evaporated, about 15 minutes.
Remove from heat and mix in apples, raisins, nuts and herbs.
Whisk together vinaigrette ingredients and pour over couscous.
Toss to coat couscous evenly.

Toasted Walnuts
I am a sucker for items at the farmers market that are a little out of the ordinary and this week it just happened to be walnuts! Unlike the walnuts that you buy at the grocery store, these guys were still in their shell (surprise surprise...). This lead to the fun task of cracking those suckers open. Without a nut cracker I resorted to a hammer and it worked juuuuuust fine.
Pre-hammer
Directions:
Preheat oven to 350F
Arrange the walnut meat in a single layer on a baking sheet.
Bake for 10-12 minutes or until golden brown.

Sunday, October 31, 2010

Roasted Beets

Going along with my root vegetable obsession, I love beets. Whenever I'm at a salad bar I typically fill half of my plate with them. A pretty cool fact about beets is that they are always in season!

Some reasons why you should incorporate beets into your diet are that they are high in dietary fiber, iron, and vitamin C. Beets stimulate the liver so they help with the detoxification of your body. Also, the Romans considered beet juice to be an aphrodisiac...

A couple of weeks ago I decided it was time to cook some beets myself. I used a boiling method but I read that beets keep the most amounts of their nutrition when they're roasted so here's my second try!

Roasted Beets

Directions:
Preheat oven to 375F
Cut off the tops of the beets and reserve the beet greens for a different recipe.
Scrub the dirt off the beets.
Line a baking dish with aluminum foil.
Put beets into lined baking dish and fold the foil so that the beets are enveloped.
Cook for about an hour, until beets are fork tender.
Take the dish out of the oven and allow to cool.
Apply pressure to the beets and the skins will slip off.

I simply drizzle the beets with olive oil and balsamic vinegar, and season with salt and pepper but here are some more intensive recipes if you are so inclined:

Beet Ravioli (not vegan)


NoteBeeturia is a harmless condition of passing red or pink color urine after eating beets and its top greens. The condition can be found in around 10-15% of the population who are genetically unable to break down betacyanin pigment.

Wednesday, October 27, 2010

Pumpkin Ravioli and Garlic Bread

Pumpkin Ravioli
I found out how to (start using) my cooked pumpkin. However this was definitely my attempt 1 at pumpkin ravioli. The pumpkin filling turned out mouth watering but the pasta part was sub-par. It tasted fine but it did not serve it's purpose of holding the filling inside of itself! Fail.


Ingredients:

Filling
2 t oil (I used almond in this recipe)
1/4 t nutmeg
1/4 t cinnamon
1/4 t cumin
dash of pepper
1/2 t salt
1/4 cup ground walnuts (or nuts of your choice)
Pasta
2 c whole wheat flour
1/2 t salt
2 T fresh thyme (or herb of your choice)
1/2 c water
1 t olive oil

Directions:
For filling:
Heat oil over medium heat in a saucepan.
Add nutmeg, cinnamon, cumin, pepper, salt and ground walnuts.
Stir in pumpkin and stir until the mixture is fragrant and the consistency of creamy mashed potatoes.
Turn off heat and set aside.
For pasta:
Mix together the wet ingredients.
Add in the dry ingredients.
Knead until a stiff dough forms.
Start heating water to a boil in a large pot, adding a dash of salt and a dollop of oil to the water.
Roll out dough on a lightly floured surface as thin as possible (working with half portions at a time).
Cut dough into similarly sized squares, around 2.5 inches each.
Spoon about 1 t of filling into the middle of a square, placing another square on top of the first and pushing edges to seal.
Gently drop ravioli into the boiling water.
Cook for 15 minutes and carefully drain.

Serve with the sauce of your choice. I mixed together olive oil, minced garlic, salt, pepper, and crushed toasted walnuts.

Garlic Bread
I bought a whole wheat baguette from Cafe Japon at the farmer's market this passed weekend for this exact purpose. Hands down best thing everrrr


Ingredients:
1 whole wheat baguette, cut into 1 inch slices
oil
1 head of roasted garlic (recipe below)
salt and pepper

Directions:
Preheat oven to 400F
Brush slices with oil and place on baking pan.
Cook until golden brown and crispy.
Mash roasted garlic with salt and pepper.
Spread slices of bread with garlic mixture.
Enjoy!

Roasted Garlic


Preheat oven to 400F
Cut off a third of each garlic head to expose the cloves.
Drizzle with 1 t oil.
Wrap head with aluminum foil and place in muffin tin.
Bake for 30-35 minutes, until the garlic is soft and tender.

Tuesday, October 12, 2010

Guest Recipe: Mix-and-Match Stir Fry

Martha Johnston is freelance graphic designer, yoga enthusiast, vegan chef, and all-around lovely, creative, beautiful soul. She also gave birth to me so she is extra special in my book.

Why yes, that is a shirt with a block of tofu on it


Martha started developing her current food philosophy in the 70s while watching her own mother and her love of cooking. She eventually "borrowed" her mom's Jane Brody's Good Food Book and adopted a high-carbohydrate (we're talking good carbs here, not white bread but whole grains), whole foods (non-processed), mostly vegetarian way of cooking and eating. From then on she has always cooked from scratch, given up on refined sugars and flours, and turned to fresh food.

Martha went full-throttle vegan a few years ago for health reasons and through this change has discovered other passions, like animal activism and holistic medicine. In her free time (and is not cooking at home), she paints and is a vegan chef at Golden Gate Cafe in Detroit.

Mix-and-Match Stir Fry
This is sort of a stir fry 101. Soups and stir fries are great because you don't need a recipe, and you can do a lot of mixing and matching. This method would lend itself to local food. Alter the recipe for what's in season!


Mushrooms, red peppers, zucchini, onions, carrots, brown rice
Garnished with edible flowers


Use whatever veggies you have. It's a great weeknight clean-out-the-fridge recipe since it's fast and easy!


Ingredients:
brown rice, cooked
1 T canola oil
lots of sliced onion
salt
pepper
garlic, minced
ginger, minced
vegetables (sliced red peppers, carrots, zucchini...)
soy sauce


Directions:
Chop vegetables thin and similar sizes so they will cook at the same amount time.
Heat about 1 tablespoon of canola oil in a saute pan at high heat.
Add the onions and a little salt and pepper to the pan and cook till they start to soften.
Toss in the remaining veggies, try not to crowd the pan. If you have any tender green (i.e. kale, bok choy...) add those towards the end.

Keep stirring, sprinkle with water and soy sauce if the veggies start to stick. Do not add too much liquid or they will become stewed veggies.
After the veggies begin to soften add minced garlic and ginger. They will burn if you add them to soon.

Add more seasoning to taste. Bragg's Liquid Aminos or soy sauce should be plenty of flavor with the garlic and ginger.


Note from Martha: Taste as you go and add less spices than you think. Every time you make it you will figure out your tastes. I like a ton of ginger and garlic (like 2 tablespoons). First time you make it only about half a tablespoon, next time add more. Use soy sauce and salt and pepper sparingly, you can always add that to taste when its done. 


Green beans, onion, red peppers, greens, brown rice
Garnished with mung bean sprouts, sesame seeds, edible flower


Garnish Ideas:
handfuls or raw fresh veggies
chopped green onions
cilantro
any kind of fresh sprouts
snow peas
peanuts, sliced thin
cashews, sliced thin


Variations:
Add in...
...sesame seeds and tiny bit of sesame oil as a finishing oil.
...Sriracha sauce or cayenne for heat.
...peanut butter mixed with Sriracha sauce.
...coconut milk and curry paste.


Thanks Mom, for passing on your love and wisdom of good food, and letting me develop my own food philosophy. I got to say, the (organic, Michigan) apple does not fall all too far from the tree...